

Showing posts with label Christmas. Show all posts

Monday, November 5, 2018

Fabulous Make Ahead Dinner Rolls

I'm a huge fan of the freezer. Anything I can do ahead of time and just pull out of the freezer is my go to. It's such an under-utilized tool in the kitchen, and ends up just being a storage space for most. I like to clean mine out and fill it with recipes like this.

Dinner Rolls

Why I like this recipe: 

  • It can be made a month ahead of time! I make these in the beginning of November and then pull them out 3 hours before Thanksgiving dinner. 
  • The rolls turn out perfect every, single time! Some bread recipes can be fussy and not rise one time and then be a showstopper another. This one provides me with consistent results. 
  • These rolls can be served with any type of meal: Thanksgiving, southern style, pasta, chicken etc. Very versatile in how many meals they can complement!
Dinner Roll Ingredients
Ingredients:
  • 3 Tbsp unsalted butter, plus more for greasing
  • 1 1/2 cup milk (whole or half and half)
  • 1/3 cup honey
  • 4 Tbsp shortening (can use butter if you don't have)
  • 5 - 5 1/2 cups of all-purpose flour
  • 1 Tbsp yeast
  • 2 tsp salt
  • 1 egg, plus 1 egg beaten with 1 Tbsp water
To begin, place the oven rack in the middle and preheat the oven to 200 degrees. Once preheated, turn the oven off and try to minimize the amount of times you open the oven door. Using butter, grease a large bowl and a 9x13 pan lined with foil. 

Place milk, honey, butter, and shortening in a microwave proof bowl, and heat for 1 - 1 1/2 minutes, until the mixture reaches approximately 110 degrees. Do not overheat the milk as that will prevent the rolls from rising. Whisk together until all the butter and shortening is melted. 

Milk, honey, butter, and shortening

In a mixer with a dough hook, add 4 1/2 cups of flour, salt, and yeast (make sure the salt and yeast are on separate sides of the bowl, like the picture below). Turn the mixer on low, and slowly add the milk mixture until combined, approximately 1 min. Increase the speed to medium and add the egg, allowing the dough to come together until it's smooth, about 2 minutes. Add another 1/2 cup of flour and mix for 6-7 minutes on medium. The dough should be smooth and have a shine; if it's sticky or wet, add up to 1/2 cup of flour more. 

Keep salt and yeast separate

On an un-floured surface, knead the dough by hand (1 -2 minutes). Once it's together in a ball and smooth, place in the greased bowl, cover with plastic wrap, and place in the oven. The dough will prove for 50 - 60 minutes, and should double in size. 

Knead the dough

Once done proving, place the dough on a floured surface. Punch the dough down, and place on a scale. Divide the weight of the dough by 15, and you will have the weight of one roll. Measure each piece and roll into a ball, making sure the top is nice and smooth. Place each roll into the foil lined pan (the rolls should be lightly touching each other) and cover with plastic wrap. Place the pan in the oven, and allow the rolls to double in size (50 - 60 minutes). 

Rolled dinner rolls

Once the rolls are done proving, take them out of the oven and preheat to 375 degrees. Take off the plastic wrap, and brush the egg mixture on top of each roll. Make sure to get the egg wash on the sides of the rolls that are visible at the top. Once the oven is ready, bake the rolls for 25 - 30 minutes until the tops are golden brown and the bottoms are cooked. I take the rolls out of the pan and gently pull down the foil to confirm the bottoms are cooked fully. 

Once the rolls are done, allow them to cool with the foil lining for 1 hour. After an hour, remove the foil and let the rolls cool for 2 hours. Once they are fully cool, they rolls should be wrapped in plastic wrap, then foil, before placing in the freezer. They can be kept in the freezer up to a month. 

The day of "roll consumption," take them out of the freezer and allow to thaw for 2 hours. Remove the plastic wrap and re-wrap them in the foil. Warm the rolls at 375 degrees for 30 minutes and serve warm.

Make Ahead Dinner Rolls

Realistic Me
Share:
Continue Reading →

Tuesday, January 16, 2018

The Best Lemon Spritz Cookies


These are another holiday favorite; however, they can be enjoyed throughout the year! The dough is simple to make, and you have beautiful decorative cookies in minutes. You can even top these off with sprinkles or dye the dough to make it fit your occasion.

Most Amazing and Buttery Spritz Cookies

Why I like this recipe
  • The dough is made in the mixer, using only one bowl
  • You do not have to grease the baking sheet. 
  • This batch provides a lot of cookies, making it great for parties and big crowds.
  • If you don't have or like lemons, simply take out that ingredient, and you'll have excellent traditional spritz cookies.
Spritz Cookie Ingredients

Ingredients
  • 1 egg yolk
  • 1 Tbsp heavy cream or milk
  • 1 tsp vanilla
  • 1 tsp lemon juice
  • 1 cup of butter, softened 
  • 2/3 cup sugar
  • 1 tsp lemon zest
  • 1/4 tsp salt
  • 2 cups of flour
Preheat the oven 375 degrees. Begin by whisking together the egg, cream, vanilla, and lemon juice in a small bowl. Set aside and cream the butter, sugar, and zest on medium speed together until light and fluffy, approximately 2-3 minutes. Add the egg mixture and combine thoroughly for 30 seconds. Turn the speed down to low, and slowly add the flour, scraping the sides of the bowl as needed.

Spritz Cookie Dough

Remove the dough and put as much in your cookie press as you can. (Alternatively you can free form or use a piping bag to form the cookies.) Press the cookies out to an ungreased pan and cook for 10-12 minutes. Careful as the different shapes of the cookies can cook at different times and these burn quickly.

Finished Spritz Cookie

The Best Lemon Spritz Cookies
Share:
Continue Reading →

Monday, December 18, 2017

No Stress Christmas Sugar Cookies


Nothing says holiday baking like sugar cookies! It's a classic, and must do on most kids' holiday lists. However, every time I attempt to do this, I end up with my feet aching and slightly grumpy. Wasn't this supposed to be fun and bring up fond memories?! My original recipe was extremely time consuming, reminded me that I'm horrible at rolling out dough, and I usually ended up with a stomach ache from trying to eat the dough instead of taking the time to bake it. (don't judge, you know you've done it too...)

Finished Christmas cookies

Why I like this recipe:

  • The dough is made in one quick and easy step, by using the food processor for mixing. 
  • Rolling the dough is done before chilling, which completes a majority of the steps before cutting and baking. This is especially great if you are cooking with children. 
  • No flour is needed for rolling out the dough, so you aren't cleaning flour out of your kitchen for months on end. 
  • The butter should be cold and straight out of the fridge, so you can get started on making the cookies right away.
  • You can use the the freezer to accelerate cooling the dough, making the prep time significantly shorter. 
Stress free Christmas Cookies

Ingredients: 
  • 1 egg
  • 1 tsp vanilla
  • 3/4 tsp salt
  • 1/4 tsp almond extract, optional as this might not be kid friendly
  • 2 1/2 cups flour
  • 1/4 tsp baking powder
  • 1/4 tsp baking soda
  • 1 cup sugar
  • 16 Tbsp unsalted butter, cold and diced in 1 inch pieces
  • Icing - see here for recipe
In the food processor, add the sugar and blend for 30 seconds. The sugar should be fine and you may see a sugar "dust" coming from your food processor. Add the chilled butter to the food processor and blend until the sugar and butter forms a ball, approximately 30 seconds. Add the egg, vanilla, salt, and almond extract and process for 10 seconds. Then add the flour, baking powder, and baking soda and blend for 30 seconds. The dough will be ready once the flour is completely combined and the dough is together, but still slightly crumbly. 

Cookie dough rolled out

On a piece of parchment paper, split the dough in half, putting one half to the side. Smooth the other into an oval shape, slightly pressing it down until it is ready to roll. Place a piece of parchment paper over the top of the dough, and roll it out to your desired thickness (mine is a 1/4 of an inch). Then take the other half and repeat, rolling the dough out between two pieces of parchment paper. Place the dough in the fridge for at least an 1.5 hours. If you are in a hurry, the dough can be put in the freezer for 30 minutes. 

Cookie dough with cookie cutter

Preheat the oven to 300 degrees, and take the dough out of the fridge. Gently peel back the top layer of parchment paper and then place it back on the dough. Flip it over, and gently peel back the bottom layer of the parchment paper. Taking off the top layer of parchment will make it easier for removing the cookies. Cut the dough with your favorite cookie cutter, and place on a rimless cookie sheet lined with parchment paper. (If you don't have a rimless cookie sheet, flip your rimmed baking sheet upside down). 

Star Christmas cookies

Bake the cookies for 14 - 17 minutes, depending on the size. I found that smaller cuts take a shorter time, so watch those carefully. Once you see the cookies are slightly golden brown around the edges, transfer them from the oven (still on the parchment paper) to a wire rack and cool until they are ready for icing, approximately 10 minutes. Decorate the cookies and serve!
No Stress Christmas Sugar Cookies
Share:
Continue Reading →

Saturday, December 16, 2017

Amazing and Simple Lemon Bars

Oh my goodness, I wait every year until Christmas to enjoy these bars! I don't know why I wait for December, as they are perfect all year long! These bars are amazingly cooked, and there are several shortcuts that make it simple and still completely delicious.

Why I like this recipe:
  • No heating the lemon filling on the stove before adding to the crust. By adding it directly to the warm crust you eliminate the need for that step. 
  • Lining the pan with parchment paper allows for easy removal, keeping the shape, and preventing the crust from sticking. 
  • The crust melts in your mouth and is all mixed in a food processor in one easy step. 
  • You can cut them into 1 inch bars, so this recipe will feed many. It is perfect for holiday parties.
Simple and Amazing Lemon Bars

Ingredients
Crust
  • 1 3/4 cups flour
  • 2/3 cup powdered sugar
  • 1/4 cup cornstarch (can sub with more powdered sugar if you don't have this)
  • 3/4 tsp salt
  • 12 Tbsp unsalted butter, cut in pieces, keep cool
Filling 
  • 4 eggs
  • 1 1/3 cup sugar
  • 3 Tbsp flour
  • 2 tsp lemon zest
  • 2/3 cup lemon juice (approximately 3-4 lemons)
  • 1/3 cup milk
  • 1/8 tsp salt
Take a 9 x 13 pan and lightly grease it so the parchment paper will stick. Line the pan with a piece of parchment paper with the corners cut about 2 inches, so it doesn't wrinkle in the pan. 

Parchment Paper in 9x13 pan

In a food processor mix the flour, powdered sugar, cornstarch, and salt together. Add the cool butter and blend for approximately 10 seconds, then pulsing together until the mixture turns a yellow color and has a crumb texture. Add the mixture to your lined pan, pressing down with your hands, then refrigerate for 30 minutes. 
Slightly yellow color and crumb like mixture

Preheat the oven to 350 degrees. 

Add the chilled crust to the oven and bake for 30 minutes. While the crust is cooking, prepare the filing by whisking together the eggs, sugar, and flour. Once combined add the lemon zest, lemon juice, milk, and salt until mixed well. 
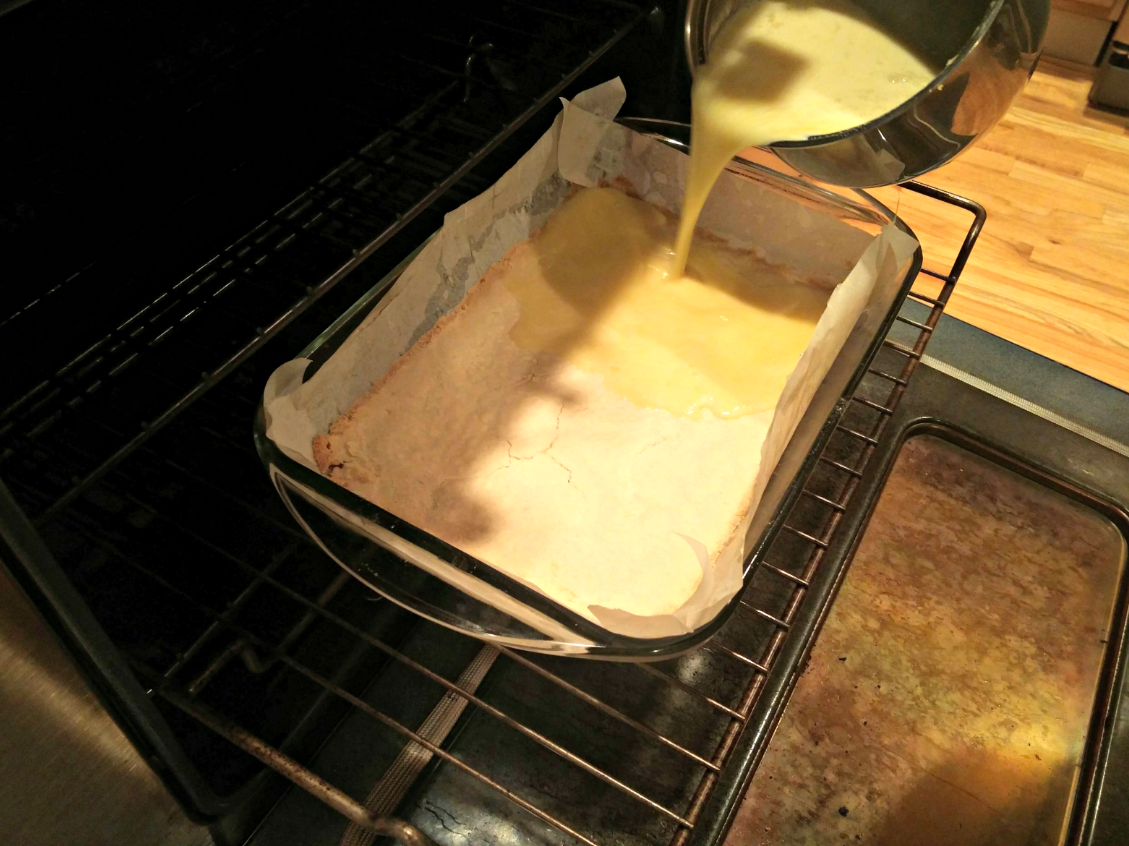
Pour the filing directly on the hot crust

Once the crust is done, reduce the oven to 325 degrees, and pour the filling directly on the warm crust in the oven. Cook until the top is firm, about 25 - 30 minutes. Once done, remove the pan to a wire rack and cool for 45 minutes until it has reached room temperature. Top with powdered sugar if desired and enjoy! 

Let the lemon bars cool

Amazing and Simple Lemon Bars
Share:
Continue Reading →

Wednesday, December 6, 2017

How to Fix Christmas Tree Lights


My husband does not celebrate Christmas, and when we first got together we agreed we would not have a Christmas tree. After years of discussion and deliberation, we came to a different compromise; we could get a tree as long as it did not cost more than $25 and we made it a "snowman tree." So this set me off with the task on how I was going to find a tree that would work.


I did not want to buy a real tree as I feel bad cutting down a tree and also, they would be more than $25. I began looking around at Goodwills and other thrift stores right after the holiday to see if any were donated. I found several and was going to buy one but found out that my work was throwing theirs away since the lights did not work.

I quickly stuffed it in the back of my Volvo and headed home. My first thought was, "oh I bet my dad can fix this up in a spiffy." When I called him, however, he was not as willing to help as I thought he would be. Apparently he has had years of practice battling lights that do not work and told me I would have to check bulb by bulb.

This was not the answer I was looking for so I quickly started researching other options. I landed upon the most amazing tool ever. It is called Light Keeper Pro, and it quickly solved my problem of having to check bulb by bulb. I first started off using the "quick fix trigger" which worked on some of the lights but not all. You put the outlet plug or one of the bulb sockets in the Light Keeper, then hit the trigger, and the lights come back on!


Once the strands that this worked for were on, I could easily see which lights needed to be changed and which were still okay. Now for the light strands that this did not work for. I used the voltage detector and started to find where it would pick up an electric circuit, then worked my way up the light strand to the point it lost detection. Once this happened, I pulled out the bulbs near this area, tested them using the bulb tester on the Light Keeper, and replaced any that were out.

Sometimes this would kick the whole light strand on, sometimes I had to keep going. When doing this, I used a green sharpie to mark the ones I had checked. This was my way of not having to go back and check bulbs I have already done.

To replace the bulbs, I went to the dollar store and got a cheap light strand that matched the color of lights on the tree. I would take the bulb out of the dollar store light strand, then put it in my tree's bulb holder. This worked for me as it was near impossible to find out the manufacturer of the tree, and replacement bulbs seemed more expensive than just buying a strand of lights.


At this point, I turned on a Christmas movie and started working away replacing any bulbs that needed fixing. Hopefully your tree will not take as long as mine; however, I do suggest picking a long movie as this part took some time. One thing I learned while doing this was to hold on to the bulb holder very carefully.  I dropped one and it immediately disappeared into the sea of green. It took some time to recover, and if you lose that part the whole strand will not turn on.

All in all, the project was a huge success as the tree was free, the Light Keeper was worth every penny, and now we have an amazing tree to look forward to every year.


What you need:

  • Light Keeper Pro

  • Green marker
  • Cheap light strand
  • Fanny pack or pocket for storing small parts, suggested but optional

Tips:
  • Look for trees right after the Christmas holiday to see if people are getting rid of their old artificial tree
  • Careful with the small parts not to drop any while changing bulbs
  • Buy a Light Keeper Pro - it is worth it

How to fix Christmas Tree Lights
Share:
Continue Reading →