Showing posts with label Special Events. Show all posts

Sunday, June 14, 2020

My oh My! It's Paleo Ice Cream

Paleo Ice Cream Header

My oh my, it is paleo ice cream! Growing up, 8:15 pm was ice cream time with my dad. I enjoyed that time and it was the perfect way to finish off the day. Seeing as I was 8 years old playing 4 sports a day, I could eat all the ice cream I wanted! 

However now I am in my thirties with more health concerns than an 8 year old, ice cream EVERY night is a no go. And to top it all off, I partake in a Whole30/Paleo diet. However, all of this does not stop that occasional craving around 8:15.


This is when my search for a reasonable Paleo ice cream recipe began. I wanted it simple as this wasn't for a special occasion, it was just to help a craving. I didn't want to spend hours on my feet for something that was suppose to be a relaxing, fun dessert at the end of the night. 

That is when I found this amazing recipe!

Ingredients: 
  • 1 14oz can of coconut milk (or cream, however the coconut taste will be much more pronounced)
  • 1/4 cup of almond or cashew butter, see recipe here
  • 1/4 cup of honey or pure maple syrup
  • 1 tsp of vanilla
  • 1/4 tsp of salt
Add all the ingredients to the blender and mix until combined, approximately 30 seconds. Sometimes I make a little coconut or almond butter before if I am out, then add the remaining ingredients and combine. 

While the ice cream maker is running, pour the liquid in. Allow the ice cream to churn for 20-25 minutes, then add to an air tight container and place in the freezer for an hour, at least. Once the mixture is completely frozen you can serve! 

My oh My! It's Paleo Ice Cream
Share:
Continue Reading →

Berry Season! How to Wash and Store


Nothing makes me happier than when the first berry starts to change color! A magical aroma fills the air and assures me that sunshine days are ahead. It is my favorite thing to pick the first berry of the season with the sun on back!


However when I bring them inside, I can see they are typically covered with dirt. I can't put my head in the sand and tell myself they were cleaned in processing and at the store. I know where these berries are from; the gross dirt from my yard. 

But that isn't going to stop me from enjoying the kick off to summer and from making amazing bakes with my homegrown berries. I have been able to find a way that fully cleans the berries and helps them last longer in the fridge. You've spent all that time taking care of the berry bushes in your yard, you are not going to let these precious gems go to waste! 


Here are the steps to take to help you enjoy them to the fullest: 

1. Fill a large bowl with 4 cups of water and a 1/2 cup of white distilled vinegar Add the berries and slow mix them around with your hand, removing the dirt and excess "stuff." There is a science behind why we use vinegar, and if you really, really want to know check out this article. Let the berries soak for at least 5 minutes. 

2. Using a colander, remove the berries from the water and rinse. Make sure to rinse well to remove any excess vinegar so you can't taste it. 

3. For the softer berries, place them out on a towel, but if they are sturdier like blueberries or strawberries you can use a salad spinner to dry. 

4. Then line an air-tight container with paper towels and add the berries. I leave one corner up to stop condensation from collecting and causing mold.

Share:
Continue Reading →

Monday, November 5, 2018

Fabulous Make Ahead Dinner Rolls

I'm a huge fan of the freezer. Anything I can do ahead of time and just pull out of the freezer is my go to. It's such an under-utilized tool in the kitchen, and ends up just being a storage space for most. I like to clean mine out and fill it with recipes like this.

Dinner Rolls

Why I like this recipe: 

  • It can be made a month ahead of time! I make these in the beginning of November and then pull them out 3 hours before Thanksgiving dinner. 
  • The rolls turn out perfect every, single time! Some bread recipes can be fussy and not rise one time and then be a showstopper another. This one provides me with consistent results. 
  • These rolls can be served with any type of meal: Thanksgiving, southern style, pasta, chicken etc. Very versatile in how many meals they can complement!
Dinner Roll Ingredients
Ingredients:
  • 3 Tbsp unsalted butter, plus more for greasing
  • 1 1/2 cup milk (whole or half and half)
  • 1/3 cup honey
  • 4 Tbsp shortening (can use butter if you don't have)
  • 5 - 5 1/2 cups of all-purpose flour
  • 1 Tbsp yeast
  • 2 tsp salt
  • 1 egg, plus 1 egg beaten with 1 Tbsp water
To begin, place the oven rack in the middle and preheat the oven to 200 degrees. Once preheated, turn the oven off and try to minimize the amount of times you open the oven door. Using butter, grease a large bowl and a 9x13 pan lined with foil. 

Place milk, honey, butter, and shortening in a microwave proof bowl, and heat for 1 - 1 1/2 minutes, until the mixture reaches approximately 110 degrees. Do not overheat the milk as that will prevent the rolls from rising. Whisk together until all the butter and shortening is melted. 

Milk, honey, butter, and shortening

In a mixer with a dough hook, add 4 1/2 cups of flour, salt, and yeast (make sure the salt and yeast are on separate sides of the bowl, like the picture below). Turn the mixer on low, and slowly add the milk mixture until combined, approximately 1 min. Increase the speed to medium and add the egg, allowing the dough to come together until it's smooth, about 2 minutes. Add another 1/2 cup of flour and mix for 6-7 minutes on medium. The dough should be smooth and have a shine; if it's sticky or wet, add up to 1/2 cup of flour more. 

Keep salt and yeast separate

On an un-floured surface, knead the dough by hand (1 -2 minutes). Once it's together in a ball and smooth, place in the greased bowl, cover with plastic wrap, and place in the oven. The dough will prove for 50 - 60 minutes, and should double in size. 

Knead the dough

Once done proving, place the dough on a floured surface. Punch the dough down, and place on a scale. Divide the weight of the dough by 15, and you will have the weight of one roll. Measure each piece and roll into a ball, making sure the top is nice and smooth. Place each roll into the foil lined pan (the rolls should be lightly touching each other) and cover with plastic wrap. Place the pan in the oven, and allow the rolls to double in size (50 - 60 minutes). 

Rolled dinner rolls

Once the rolls are done proving, take them out of the oven and preheat to 375 degrees. Take off the plastic wrap, and brush the egg mixture on top of each roll. Make sure to get the egg wash on the sides of the rolls that are visible at the top. Once the oven is ready, bake the rolls for 25 - 30 minutes until the tops are golden brown and the bottoms are cooked. I take the rolls out of the pan and gently pull down the foil to confirm the bottoms are cooked fully. 

Once the rolls are done, allow them to cool with the foil lining for 1 hour. After an hour, remove the foil and let the rolls cool for 2 hours. Once they are fully cool, they rolls should be wrapped in plastic wrap, then foil, before placing in the freezer. They can be kept in the freezer up to a month. 

The day of "roll consumption," take them out of the freezer and allow to thaw for 2 hours. Remove the plastic wrap and re-wrap them in the foil. Warm the rolls at 375 degrees for 30 minutes and serve warm.

Make Ahead Dinner Rolls

Realistic Me
Share:
Continue Reading →

Saturday, July 14, 2018

Grandma's Icebox Lemon Pie


This cake is a staple in my house, and is a must for any summer birthday, party, baby shower... (the list goes on and on). It is simple to make and can be done a day ahead to save on precious time!

Grandma's Icebox Lemon Pie

Why I like this recipe: 

  • You can make this recipe the day ahead of the event you plan on serving the pie. Even better, the pie gets better with time. The flavors even out and have time to shine!
  • This recipe may seem long; however, the actual prep time is minimal. Much of the time is when the pie or crust is cooling. You can slip away to do other important things while the pie does all the work in the fridge!
  • No decorating is needing to make this look fantastic. Simply spreading the whip cream over the pie is the finishing touch, and takes little skill.
  • This recipe was been perfected over generations, and tastes deliciously rich and fresh!
Icebox Lemon Pie


Ingredients: 
  • 9 graham crackers
  • 3 Tbsp sugar
  • 5 Tbsp butter, melted
  • 2 cans (14 oz) sweetened condensed milk 
  • 3 egg yolks
  • 3/4 cup and 2 Tbsp of lemon juice
  • 1 cup heavy cream
  • 1/2 tsp vanilla 
Preheat the oven to 325 degrees with the rack positioned in the middle. 

Blend the graham crackers and sugar into the food processor for approximately 30 seconds. Add the butter and process for 8 pulses, until the butter is fully combined with the crumbs. Put the mixture in a 9 inch pie pan, and press down on the bottom and sides. (I have found hands work best for this step) Bake until slightly brown and fragrant, approximately 15 minutes. Allow the crust to cool for 30 minutes. 
Graham Cracker Crust

Increase the oven temperature to 375 degrees. Place 3 tablespoons of condensed milk and the vanilla extract in a small container and set aside. Whisk the remaining condensed milk and eggs, until it has a smooth texture, about 1 minute. Slowly add the lemon juice to the mixture, and once fully combined, pour over the cooled crust. Bake for 15 minutes. When the edges are set, but the rest is slightly wobbly, take out of the oven and allow to cool for 1 hour. 
Lemon Pie in Oven

Then add the pie to the refrigerator for at least 4 hours and up to 24 hours. Right before you are ready to serve take the cream and the condensed milk and vanilla you added to a container into a mixer, and whisk for 2 minutes over high. Once it is whipped cream, spread over the pie, and eat!

Finished Icebox Lemon Pie

Share:
Continue Reading →

Thursday, July 5, 2018

Fast and Easy Grilled Chicken Wings


I don't know what it is, I absolutely love wings. I know it isn't very culinary or fancy; however, they just make me so happy. Normally I would have to go out to a pub to get some good wings, but I would leave with a heavy bar tab and not feeling like it was worth the money! Here is my remedy to this situation, and to make it even better, it is fast and easy!
Fast and Easy Chicken Wings

Why I love this recipe:

  • This seems like a silly reason, but I only use two measuring spoons for the whole recipe. Aka...less dishes, less thought: just through in a teaspoon or a half teaspoon of that in there!
  • The grill keeps the heat out of the house on hot summer days. 
  • I also claim I do not know how to work the grill, so my husband does all the cooking. Shhh....don't tell him I really do! 
  • These wings aren't heavy, and the recipe is actually pretty healthy! It doesn't leave you feeling like you will have to run miles to work off what you just ate.
  • They come out so crispy, it is just like they were fried! This way you don't have the oil, and potential fire hazard of frying yourself!
  • You can double, triple, or quadruple this recipe and make it for a crowd! Looks like a lot of work, but it really isn't! If you have an event, it is a cheap way to provide amazing food!
Wings on the Grill

Ingredients:
  • ½ cup salt
  • 2 quarts of water
  • 2 pounds chicken wings or drumsticks
  • 1 ½ teaspoons cornstarch
  • ½ teaspoon pepper
  • 1 teaspoon chili powder
  • 1 teaspoon paprika
  • ½ teaspoon garlic powder
  • ½ teaspoon dried oregano
  • ½ teaspoon sugar
  • 1/4 teaspoon cayenne, optional
Mix the water and salt in a large bowl and then place the chicken in the water. Cover and let the chicken brine in the refrigerator for approximately 30 minutes. 

Dry Rub Spices for Wings

While the chicken is in the fridge, mix all the remaining seasons together in a small bowl. Don't be alarmed that the seasons all together look "pale." They brighten up once you put them on the chicken. 

Wings Ready to Go

Heat your grill accordingly (gas: heat for 15 min on high), then turn down to medium-low. Place the wings skin side up, and cook for 10-12 minutes. Flip the chicken, and let the skin crisp up for 10 minutes more of cooking. Once removed from the gill, cover with foil and let rest for 5 minutes. 

BBQ Wings for a Crowd

Share:
Continue Reading →

Wednesday, June 27, 2018

Easy French Puff Pastry: Gougeres

This recipe is so good, and they seem to disappear quickly! Might consider making this a double batch as they are inhaled almost immediately. It seems like you eat one, and are immediately reaching for another! A good problem to have!

Why I like this recipe:
  • This recipe has so many make ahead options; and, I love things I can make ahead! I either make the dough and cover in the fridge before baking. Or if I have enough room in my fridge, I scoop them out onto the baking sheet and cover in the fridge until ready to be baked. Or I bake them completely ahead of time and give them a quick warm up in the oven before eating. So many options makes it a great recipe to fit into a busy schedule. 
  • To warm up previously frozen gourges, put in the oven at 300 degrees for 7-10 minutes.
  • Ingredients are minimal and commonly found in the pantry, so you can whip them up quickly when having unexpected company (or poor planning on my part). 
Ingredients:
  • 2 eggs and 1 egg white
  • 1/4 tsp of salt
  • 4 Tbsp of butter
  • 1/2 cup of water
  • 1/8 - 1/4 tsp cayenne
  • 1/2 cup of flour
  • 1 cup shredded cheese (preferred gruyère cheese)
Preheat the oven to 425 degrees, and line two baking sheets with parchment paper.

In a 1 cup measuring cup, take the eggs and salt and whisk completely together. If you have more than 1/2 of a cup after mixing, remove excess. Having too much egg will make your dough have too liquid to rise into a puff. Over medium heat add the water, butter, and cayenne in a small sauce pan until simmering. Once at a simmer, add the flour and quickly stir together until it combines into a ball shape. 

Add the dough into a food processor and mix quickly for 10 seconds, allowing the steam to come out of the opening. While mixing, slowly add the egg, then the cheese and process for 30 - 40 seconds. The dough should be dense and have a creamy, batter type of consistency. Using a Tbsp, level the dough, and using another small spoon to scoop it out onto the baking sheet. Once done, you should have approximately 24 puffs.


Bake for 15 - 20, until 2/3 of the puff are golden brown. Then turn off the oven and continue to bake for another 10 minutes. Make sure not to open the oven too much when checking on the puffs while the oven is off. Serve fresh out of the oven and warm.


<!-- Global Site Tag (gtag.js) - Google Analytics
-->
Share:
Continue Reading →

Tuesday, January 16, 2018

The Best Lemon Spritz Cookies


These are another holiday favorite; however, they can be enjoyed throughout the year! The dough is simple to make, and you have beautiful decorative cookies in minutes. You can even top these off with sprinkles or dye the dough to make it fit your occasion.

Most Amazing and Buttery Spritz Cookies

Why I like this recipe
  • The dough is made in the mixer, using only one bowl
  • You do not have to grease the baking sheet. 
  • This batch provides a lot of cookies, making it great for parties and big crowds.
  • If you don't have or like lemons, simply take out that ingredient, and you'll have excellent traditional spritz cookies.
Spritz Cookie Ingredients

Ingredients
  • 1 egg yolk
  • 1 Tbsp heavy cream or milk
  • 1 tsp vanilla
  • 1 tsp lemon juice
  • 1 cup of butter, softened 
  • 2/3 cup sugar
  • 1 tsp lemon zest
  • 1/4 tsp salt
  • 2 cups of flour
Preheat the oven 375 degrees. Begin by whisking together the egg, cream, vanilla, and lemon juice in a small bowl. Set aside and cream the butter, sugar, and zest on medium speed together until light and fluffy, approximately 2-3 minutes. Add the egg mixture and combine thoroughly for 30 seconds. Turn the speed down to low, and slowly add the flour, scraping the sides of the bowl as needed.

Spritz Cookie Dough

Remove the dough and put as much in your cookie press as you can. (Alternatively you can free form or use a piping bag to form the cookies.) Press the cookies out to an ungreased pan and cook for 10-12 minutes. Careful as the different shapes of the cookies can cook at different times and these burn quickly.

Finished Spritz Cookie

The Best Lemon Spritz Cookies
Share:
Continue Reading →

Monday, December 18, 2017

No Stress Christmas Sugar Cookies


Nothing says holiday baking like sugar cookies! It's a classic, and must do on most kids' holiday lists. However, every time I attempt to do this, I end up with my feet aching and slightly grumpy. Wasn't this supposed to be fun and bring up fond memories?! My original recipe was extremely time consuming, reminded me that I'm horrible at rolling out dough, and I usually ended up with a stomach ache from trying to eat the dough instead of taking the time to bake it. (don't judge, you know you've done it too...)

Finished Christmas cookies

Why I like this recipe:

  • The dough is made in one quick and easy step, by using the food processor for mixing. 
  • Rolling the dough is done before chilling, which completes a majority of the steps before cutting and baking. This is especially great if you are cooking with children. 
  • No flour is needed for rolling out the dough, so you aren't cleaning flour out of your kitchen for months on end. 
  • The butter should be cold and straight out of the fridge, so you can get started on making the cookies right away.
  • You can use the the freezer to accelerate cooling the dough, making the prep time significantly shorter. 
Stress free Christmas Cookies

Ingredients: 
  • 1 egg
  • 1 tsp vanilla
  • 3/4 tsp salt
  • 1/4 tsp almond extract, optional as this might not be kid friendly
  • 2 1/2 cups flour
  • 1/4 tsp baking powder
  • 1/4 tsp baking soda
  • 1 cup sugar
  • 16 Tbsp unsalted butter, cold and diced in 1 inch pieces
  • Icing - see here for recipe
In the food processor, add the sugar and blend for 30 seconds. The sugar should be fine and you may see a sugar "dust" coming from your food processor. Add the chilled butter to the food processor and blend until the sugar and butter forms a ball, approximately 30 seconds. Add the egg, vanilla, salt, and almond extract and process for 10 seconds. Then add the flour, baking powder, and baking soda and blend for 30 seconds. The dough will be ready once the flour is completely combined and the dough is together, but still slightly crumbly. 

Cookie dough rolled out

On a piece of parchment paper, split the dough in half, putting one half to the side. Smooth the other into an oval shape, slightly pressing it down until it is ready to roll. Place a piece of parchment paper over the top of the dough, and roll it out to your desired thickness (mine is a 1/4 of an inch). Then take the other half and repeat, rolling the dough out between two pieces of parchment paper. Place the dough in the fridge for at least an 1.5 hours. If you are in a hurry, the dough can be put in the freezer for 30 minutes. 

Cookie dough with cookie cutter

Preheat the oven to 300 degrees, and take the dough out of the fridge. Gently peel back the top layer of parchment paper and then place it back on the dough. Flip it over, and gently peel back the bottom layer of the parchment paper. Taking off the top layer of parchment will make it easier for removing the cookies. Cut the dough with your favorite cookie cutter, and place on a rimless cookie sheet lined with parchment paper. (If you don't have a rimless cookie sheet, flip your rimmed baking sheet upside down). 

Star Christmas cookies

Bake the cookies for 14 - 17 minutes, depending on the size. I found that smaller cuts take a shorter time, so watch those carefully. Once you see the cookies are slightly golden brown around the edges, transfer them from the oven (still on the parchment paper) to a wire rack and cool until they are ready for icing, approximately 10 minutes. Decorate the cookies and serve!
No Stress Christmas Sugar Cookies
Share:
Continue Reading →

Saturday, December 16, 2017

Amazing and Simple Lemon Bars

Oh my goodness, I wait every year until Christmas to enjoy these bars! I don't know why I wait for December, as they are perfect all year long! These bars are amazingly cooked, and there are several shortcuts that make it simple and still completely delicious.

Why I like this recipe:
  • No heating the lemon filling on the stove before adding to the crust. By adding it directly to the warm crust you eliminate the need for that step. 
  • Lining the pan with parchment paper allows for easy removal, keeping the shape, and preventing the crust from sticking. 
  • The crust melts in your mouth and is all mixed in a food processor in one easy step. 
  • You can cut them into 1 inch bars, so this recipe will feed many. It is perfect for holiday parties.
Simple and Amazing Lemon Bars

Ingredients
Crust
  • 1 3/4 cups flour
  • 2/3 cup powdered sugar
  • 1/4 cup cornstarch (can sub with more powdered sugar if you don't have this)
  • 3/4 tsp salt
  • 12 Tbsp unsalted butter, cut in pieces, keep cool
Filling 
  • 4 eggs
  • 1 1/3 cup sugar
  • 3 Tbsp flour
  • 2 tsp lemon zest
  • 2/3 cup lemon juice (approximately 3-4 lemons)
  • 1/3 cup milk
  • 1/8 tsp salt
Take a 9 x 13 pan and lightly grease it so the parchment paper will stick. Line the pan with a piece of parchment paper with the corners cut about 2 inches, so it doesn't wrinkle in the pan. 

Parchment Paper in 9x13 pan

In a food processor mix the flour, powdered sugar, cornstarch, and salt together. Add the cool butter and blend for approximately 10 seconds, then pulsing together until the mixture turns a yellow color and has a crumb texture. Add the mixture to your lined pan, pressing down with your hands, then refrigerate for 30 minutes. 
Slightly yellow color and crumb like mixture

Preheat the oven to 350 degrees. 

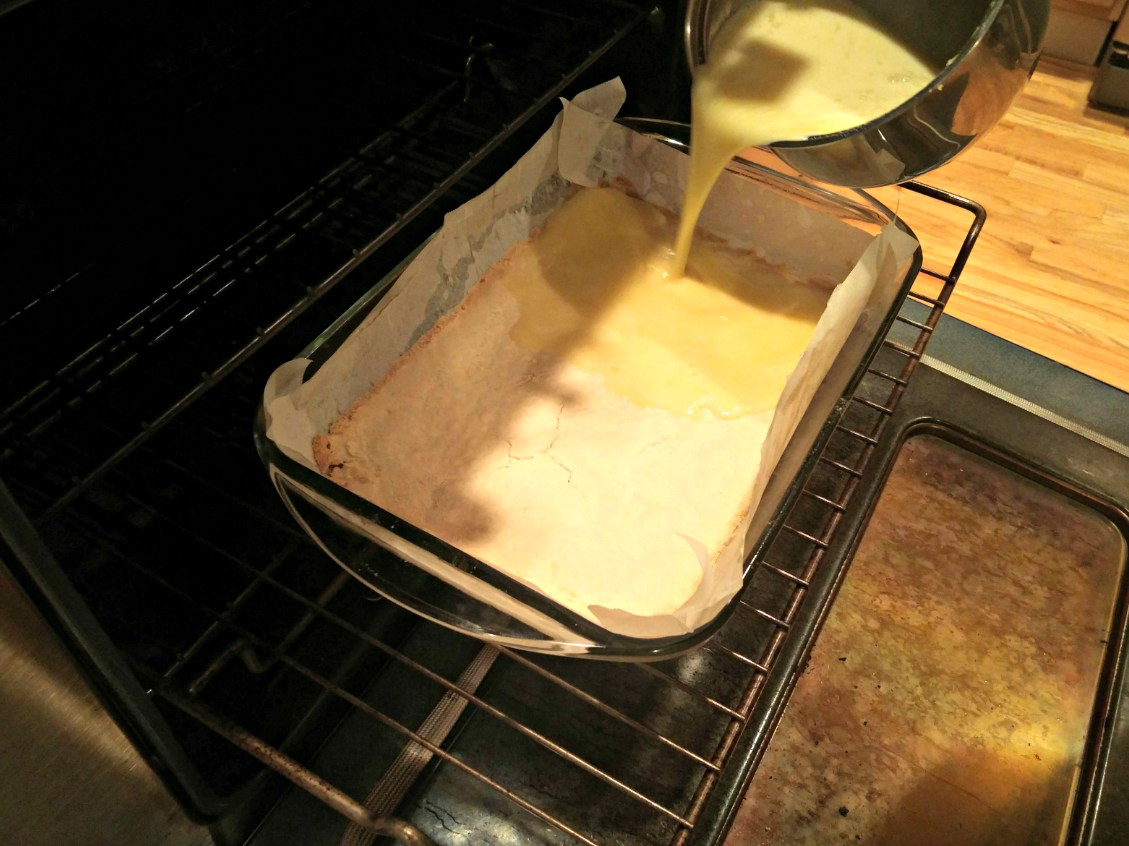
Add the chilled crust to the oven and bake for 30 minutes. While the crust is cooking, prepare the filing by whisking together the eggs, sugar, and flour. Once combined add the lemon zest, lemon juice, milk, and salt until mixed well. 
Pour the filing directly on the hot crust

Once the crust is done, reduce the oven to 325 degrees, and pour the filling directly on the warm crust in the oven. Cook until the top is firm, about 25 - 30 minutes. Once done, remove the pan to a wire rack and cool for 45 minutes until it has reached room temperature. Top with powdered sugar if desired and enjoy! 

Let the lemon bars cool

Amazing and Simple Lemon Bars
Share:
Continue Reading →

Sunday, December 10, 2017

What to Do on NYE


New Years is one of those holidays that I can’t decide whether I love it or hate it. It largely depends on how I set my expectations. If I build it up to be this big holiday, watch too many movies with NYE celebrations in them, or daydream about the holiday too much, then it turns to be a big letdown. You mean I don't have a 100-foot yacht and enough money for my own personal fireworks show?!? It’s no wonder that the holiday turns to be a letdown when I expect it to be as grand as all of that.


Oddly enough, when I have no plans or expectations, it turns out to be the best NYE ever. One particular NYE, my husband and I got off a 9 hour flight and were going to take a quick nap before heading out to his mom's to have a low key night. Well, falling asleep at 3 pm seemed okay, but when we woke up at 9:00 we were scrambling.

We hadn't called, made any food, and felt horrible about oversleeping. We called the first restaurant that we thought might be open, asked his mom to meet us there, and drove 80 on the highway. We made it with 1 hour till midnight and agreed that “whatever happens, happens”, because we were just grateful we didn't completely oversleep!


It turned out to be the most fun and closest I had been to being on a boat for NYE. The restaurant had a live band that played Auld Lang Syne at midnight, the food was amazing, and the staff was so friendly. Now this did come with a cost and it wasn't a cheap night by any means, but reminded me that sometimes low expectations are the best when it comes to planning.

So how do you go about this? It’s important to keep in mind what matters most to you. Is it saving money? Being surrounded by people? Not being surrounded by people? Getting s#$*face drunk and throwing up on your neighbor’s fence? You would be surprised, but that could be someone's idea of a great NYE. While I probably don't have much advice on the last question, or want to get involved in a neighborly dispute, I can help with the others!


Save Money
  • Find a Groupon to a restaurant: If you plan ahead and check the fine print, a Groupon can be a great option for having a fun NYE while saving some mula. My husband and I discovered our favorite Italian restaurant this way! We had no plans for NYE except to buy a car for my husband, and when we were done, we were starving and slightly angry (aka, hangry). We pulled up a Groupon, called the restaurant, and headed that way for a fantastic meal! We were so full afterwards, that going home and watching the fireworks on TV seemed perfectly acceptable. Now this doesn't have to be for a meal, maybe it’s for a bowling alley or brewery in the area. Take a look at what Groupon has and plan a fun evening. 

  • Game Night with Friends: Invite a select few of friends over for an ole fashion game night! Keeping it just a couple of people will keep the cost down, as well as the stress. You can ask people to bring over their favorite game, have some drinks, and soon the good times will be going. I would suggest ending the night with a good game of Cards Against Humanity and just relax to ring in the New Year with laughter. 
Around People
  1. Fancy Dinner: Sometimes we don't feel like being hermits, but don't want to go to a raging party or can't wrangle all our friends together on the night of NYE. If we still feel like doing something special, we decide to invest in a fun night out. We pick a restaurant, put on our fancy clothes, and head out. This way we are going out, and we feel like we are doing something fun. There is the extra bonus that typically the restaurant we pick is packed with people, so we don't feel like hermits either. It can be really fun to ring in the new year at the restaurant with the other patrons, making some new friends at the same time!

  1. Throw a Party: If you are able to get your friends together, why not have people over! The best part about NYE is typically people come over after dinner, so you don't have the expectation to feed them other than light appetizers (which you can find in the freezer aisle), and you don't have to go anywhere. The party literally comes to you, you are surrounded by your friends, and you get to start the year with a fun celebration! 
Just You (or the Two of You)
  1. Make a Special Meal: It is totally fair if you don't want to be surrounded by people and want to save money. Especially after the holidays which can be both stressful and expensive. So why not make your favorite meal, pick out an enjoyable movie, and have a night in? Plus, since when did it become taboo to have some R&R time to "hit the restart" button? It’s completely acceptable to not want to be driving during the most dangerous night of the year, and completely fine to need some down time. However, I understand the guilt that comes along with that decision, so make it a special night in for yourself. Make a special meal, enjoy a nice glass of wine, and go to bed early if you want! (I won't tell)

  1. Take a Mental Health Day: Okay, if the one above sounds a little too low key, that’s fair. So why not take a day and completely focus on yourself. Of course you have work and obligations at home, so like any responsible adult, you’ve been slammed with errands and haven't had time for, let’s say, reading a book or going for a run. Well today is your day! You can make the decision to do the things you’ve been craving to do, but there hasn’t been enough time. Well now there is, and it is your own mental health day to take a break and completely focus on yourself. 
What to do on NYE
Share:
Continue Reading →