I’m going to be honest, I had to prepare myself to do the
write up of this recipe. I struggle with classifying it as a “realistic meal”
as it is time consuming and has multiple steps. But let me tell you, this one
is worth it! If you feel like your Thanksgiving desserts are starting to get a
little dry or same ole, same ole, this is the recipe for you. Even
non-cheesecake lovers have loved this dessert, and maybe being able to make it
the day before should help!
Crust: Preheat
the oven to 325 with the rack to the lower-middle position. Grease the pan with
the inside of the butter wrapper, making sure to get the sides. In the food
processor pulse crackers, sugar, and spices until it has a fine, even
consistency. I was taught to always do 2-3 second pulses to insure that the
crackers are evenly processed.
Add the
melted butter, and stir in the butter until fully mixed with the crackers. Put
the crumbs into springform pan and, use your hand to spread crumbs into even
layer on the bottom of the pan. Save yourself the cleaning of extra utensils
like spoons or bottom of glasses, and use your hand to press down on the crumbs.
Bake until fragrant and the crust has browned slightly, about 15 minutes. Allow
the crust to cool completely before adding the filing, about 30 minutes.

Filling: Bring
about 4 quarts of water to simmer in stockpot. I used to always read this and
wonder why I needed hot water; sometimes skipping this step thinking it was a
mistake. Don’t do that; you need it for the bath around the cheesecake while in
the oven. Combine the sugar, spices, and salt in small bowl and set aside. In a
standing mixer, mix the cream cheese until it has a soft, “whipped”
consistency, about 1 minute. Add 1/3 of the sugar mixture, mix until fully
combined, scrape the side of the bowl, and add another 1/3 of the sugar
mixture. After that is fully combined again, scrape the side of the bowl, and
add the remaining amount of sugar.
Add the pumpkin, vanilla, and lemon juice, and mix until
combined, about 1 minute and scrape the side of the bowl. Add 3 eggs and mix
for about 1 minute, scrape the side of the bowl, and add the remaining 2 eggs.
Mix for another minute, and scrape the sides before adding the heavy cream. Mix
the heavy cream on low until fully combined. Finally, stir the mixture by hand
making sure to get the sides of the bowl.

Wrap foil around the bottom of the pan, making sure there
are no places for water to seep in. I go a little crazy when wrapping foil
around pan and do it at least twice because a soggy crust due to water leaking
in, will be heart crushing after all your hard work. Pour the filling into the
pan and tap the side of the pan once or twice, removing any air bubbles and
smoothing the top. Set the cake in a large roasting pan, and surround the
springform pan with boiling water, about hallway up. Bake for 1 ½ hours, until
the center still jiggles slightly, and remove the cake from the oven. Mine
tends to take a little longer than 1 ½ hours, so don’t panic if you don’t think
it is quite ready to be removed from the oven.
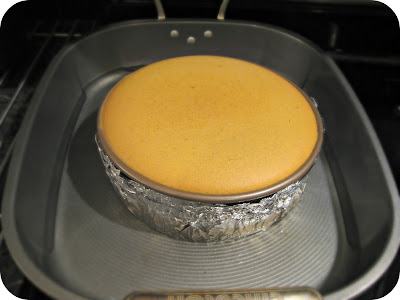
Allow the cake to continue cooking in the water for
approximately 45 minutes. Remove the springform from the water, and cool for an
additional 3 hours before placing into the refrigerator. I also always forget
about the “cool for 3 hours” part when making this recipe as well. Make sure
you are starting this early enough in the day that you don’t want to go to bed
right after making this cake. A friend had her husband get up in the middle of the
night to put the cake in the fridge. I don’t know about you, but would rather
not have to make this ask the night before company is coming over! The cake
should be refrigerated for at least 4 hours and up to 24 hours. When serving,
take a paring knife and run it around the sides of the pan. Release the
springform pan, carefully remove the side, and serve!

Dry Pumpkin:
Spread the pumpkin out of the can onto a baking sheet lined with paper towels,
two to three layers. Cover pumpkin with another layer of paper towels and press
firmly until paper towels are no longer absorbing liquid. Remove the top layer
of towels and fold pumpkin in half; peeling back the towels on the bottom. Add
another layer of paper towels to the top, and repeat. Continue to flip the pumpkin,
pressing down to absorb as much liquid as possible.
Crust:
9 graham crackers broken into 1” pieces, one packet
3 tbsp sugar
½ tsp ground ginger
½ tsp cinnamon
¼ tsp ground cloves
6 tbsp unsalted butter, melted
Filing:
1 1/3 cups sugar
1 tsp cinnamon
½ tsp ground ginger
¼ tsp ground nutmeg
¼ tsp ground cloves
¼ tsp allspice
½ tsp salt
1 can (15 oz) pumpkin
1.5 lbs cream cheese, room temperature
1 tbsp vanilla extract
1 tbsp lemon
5 large eggs
1 cup heavy cream
Crust: Preheat
the oven to 325 with the rack to the lower-middle position. Grease the pan with
the inside of the butter wrapper, making sure to get the sides. In the food
processor pulse crackers, sugar, and spices until it has a fine, even
consistency. Add the melted butter, and stir in the butter until fully mixed
with the crackers. Put the crumbs into springform pan and, use your hand to spread
crumbs into even layer on the bottom of the pan. Bake until fragrant and the
crust has browned slightly, about 15 minutes. Allow the crust to cool
completely before adding the filing, about 30 minutes.
Filling: Bring
about 4 quarts of water to simmer in stockpot. Combine the sugar, spices, and
salt in small bowl and set aside. In a standing mixer, mix the cream cheese
until it has a soft, “whipped” consistency, about 1 minute. Add 1/3 of the
sugar mixture, mix until fully combined, scrape the side of the bowl, and add
another 1/3 of the sugar mixture. After that is fully combined again, scrape
the side of the bowl, and add the remaining amount of sugar.
Add the pumpkin, vanilla, and lemon juice, and mix until
combined, about 1 minute and scrape the side of the bowl. Add 3 eggs and mix
for about 1 minute, scrape the side of the bowl, and add the remaining 2 eggs.
Mix for another minute, and scrape the sides before adding the heavy cream. Mix
the heavy cream on low until fully combined. Finally, stir the mixture by hand
making sure to get the sides of the bowl.
Wrap foil around the bottom of the pan, making sure there
are no places for water to seep in. Pour the filling into the pan and tap the
side of the pan once or twice, removing any air bubbles and smoothing the top.
Set the cake in a large roasting pan, and surround the springform pan with
boiling water, about hallway up. Bake for 1 ½ hours, until the center still
jiggles slightly, and remove the cake from the oven.
Allow the cake to continue cooking in the water for
approximately 45 minutes. Remove the springform from the water, and cool for an
additional 3 hours before placing into the refrigerator. The cake should be
refrigerated for at least 4 hours and up to 24 hours. When serving, take a
paring knife and run it around the sides of the pan. Release the springform
pan, carefully remove the side, and serve!
Dry Pumpkin: Spread
the pumpkin out of the can onto a baking sheet lined with paper towels, two to
three layers. Cover pumpkin with another layer of paper towel, s and press firmly
until paper towels are no longer absorbing liquid. Remove the top layer of
towels and fold pumpkin in half; peeling back the towels on the bottom. Add
another layer of paper towels to the top, and repeat. Continue to flip the
pumpkin, pressing down to absorb as much liquid as possible.
Pumpkin Cheesecake: The Pie Alternative